 Cortadores de fresagem de precisão,Ferramentas de corte para usinagem CNC de todos os materiais

Choosing an end mill for deep cavity milling starts with two questions: Can the tool reach the cutting area without interference, and what finished geometry does the cavity require? First determine the required reach and clearance. Then choose the cutting-end geometry—square, ball nose or corner radius—according to the feature that must be machined.
A deep cavity does not automatically require the longest available tool. If a standard-reach end mill can access the feature without interference from the tool body or holder, it may already be sufficient. Long-reach, long-neck or necked configurations become relevant when additional access or clearance is actually required.
Which End Mill Should You Use for Deep Cavity Milling?
There is no single end mill geometry that suits every deep cavity. The finished feature determines the cutting-end geometry, while cavity depth and surrounding walls determine the required reach and clearance.
| Deep Cavity Requirement | Geometria final | Reach Direction |
|---|---|---|
| Flat bottom and straight walls | Quadrado / Fresa de topo plano | Standard or extended reach depending on access |
| Curved or 3D surfaces | Fresa de ponta esférica | Standard or extended reach depending on cavity depth |
| Flat-bottom area with a radiused internal corner | Fresa de topo com raio de canto | Standard or extended reach depending on access |
The basic selection rule is:
Finished geometry determines the cutting end. Access and clearance determine the required tool structure.
Por exemplo, a ball nose end mill may provide the correct geometry for a curved cavity surface, but the standard version may still be too short to reach the feature. Nesse caso, the geometry remains ball nose while the required structure changes to a longer-reach configuration.
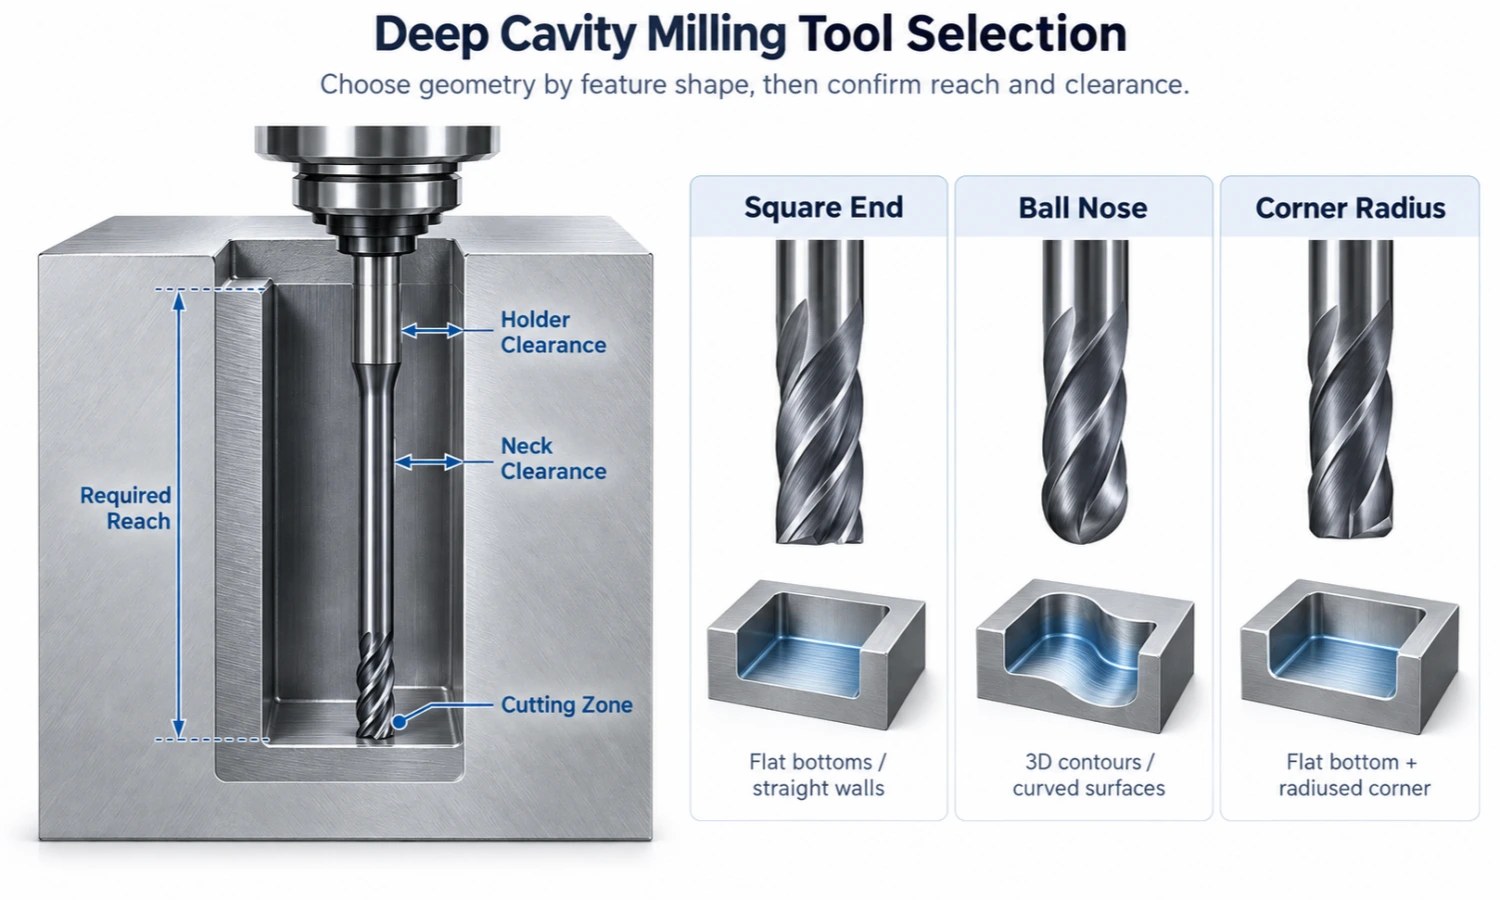
Determine the Required Reach and Clearance
Deep cavity machining requires more than checking the total cavity depth. The cutting end must reach the machining area, but the neck, tool body and holder must also approach the feature without interference.
Required Reach and Effective Length
Start by determining how far the cutting end must reach from the accessible surface to the actual machining area.
Do not use overall tool length alone to make this decision. A tool may have a long overall length while still lacking the effective reach needed for a recessed feature.
Flute length and required reach are different selection dimensions. Comprimento da Flauta, or Length of Cut (LOC), describes the available cutting-edge length. Required reach describes how far the cutting end must access into the feature.
In CutterBest long-neck product specifications, this access dimension may be listed as Effective Length (L2). Other manufacturers may use terms such as reach or length below shank. Portanto, compare the actual dimensions shown in the applicable tool drawing rather than assuming that catalog terminology is universal.
For deep cavity milling, select enough reach to access the required area, but avoid adding unnecessary overhang.
Longer reach can increase sensitivity to deflection and chatter because the cutting edge operates farther from the tool-holding point. Por esta razão, the shortest configuration that still provides the required access is generally the better starting point.
If the required machining area cannot be reached with a standard configuration, ver Long Reach End Mills.
Neck Diameter and Neck Clearance
Reach answers one question:
Can the cutting end get deep enough?
Neck clearance answers another:
Can the tool enter the feature without the surrounding walls or shoulders interfering with the tool body?
This distinction becomes important in narrow or recessed cavities.
A long-neck or necked configuration can provide clearance between the cutting section and the larger shank area. A reduced-neck or neck-relieved tool has a narrower neck/body section than the adjacent larger shank or body, which can create additional clearance around the tool. Check the actual neck diameter against the available side clearance in the feature.
Do not assume that the neck diameter is always smaller than the cutting diameter. Confirm the dimensions shown in the applicable tool drawing.
No entanto, reduced neck should not be treated as a requirement for every deep cavity. The required neck diameter depends on the actual cavity geometry and available side clearance.
Tool Body and Holder Clearance
The cutting end may have enough reach while the larger tool body or holder still interferes with the workpiece.
Por esta razão, deep cavity tool selection should consider the complete access path, not only the distance from the cavity opening to the cutting surface.
Before choosing the final tool, check whether:
- the cutting end reaches the required depth;
- the neck clears surrounding walls or shoulders;
- the larger tool body can approach the feature;
- the holder can reach the machining position without interference.
Also verify clearance for the complete cutter–neck–shank–holder assembly along the approach and cutting path, not only at the deepest machining position.
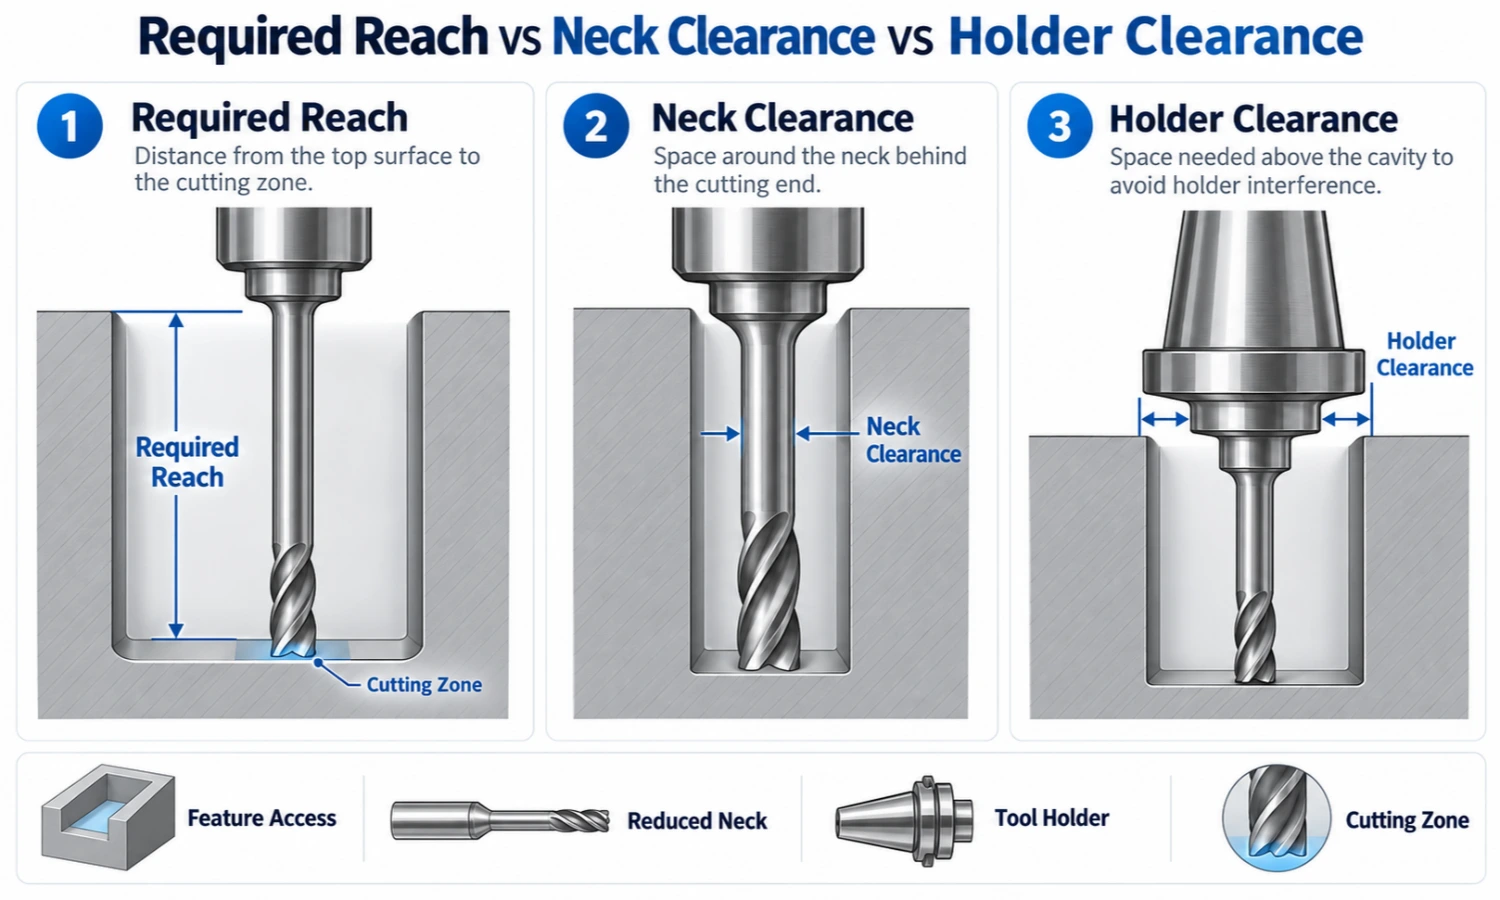
Deep enclosed features can also make chip evacuation more difficult. Chip control and machining parameters should be evaluated separately for the actual application rather than assumed from tool length alone.
Choose the End Geometry for the Finished Cavity Feature
Once the required access and clearance are known, select the cutting-end geometry according to the finished feature.
The key question is not simply: “Which end mill is best for deep cavity milling?”
Instead ask: “What geometry must this cutter produce at the bottom and walls of the cavity?”
Square End Mills for Flat Bottoms and Straight Walls
Choose square or flat-end geometry when the cavity requires a flat-bottom feature and straight-wall geometry.
If the feature is easy to reach, a standard flat end mill may be sufficient. When the same geometry sits deeper inside the workpiece and additional neck clearance is required, a long-neck configuration can provide the necessary access.
For deeper flat-bottom or straight-wall features, ver Long Neck Square End Mill.
The reach requirement and cutting geometry should still be selected separately. A deep feature does not change the need for square-end geometry if the required finished shape remains flat and straight.
Ball Nose End Mills for Curved and 3D Surfaces
Ball nose geometry is better suited to curved surfaces, 3D contours and cavity features where the cutting end must follow a continuously changing surface.
This makes ball nose end mills relevant to many mold-cavity and contour-finishing applications.
When the curved surface is located deeper inside the workpiece, the same ball nose geometry may require a longer-reach structure to access the cutting area.
Para essas aplicações, ver Long Reach Ball Nose End Mill.
Do not choose a ball nose end mill only because a cavity is deep. The finished surface geometry should determine whether a ball-end profile is actually required.
Corner Radius End Mills for Radiused Internal Corners
Corner radius end mills retain a flat-ended cutting area while adding a defined radius between the end and side cutting edges.
This geometry is useful when the cavity requires a flat-bottom area together with a radiused internal corner or bottom-to-wall transition.
If the feature also requires additional reach or neck clearance, a long-neck corner-radius configuration can combine the required end geometry with deeper access.
See Long Neck Corner Radius End Mill.
Again, the corner radius should be selected according to the required finished feature rather than simply because the cavity is deep.
Standard Reach vs Long Reach for Deep Cavity Milling
A deep cavity does not automatically mean that a long-reach tool is required.
The correct choice depends on whether a standard tool can reach the cutting area and maintain sufficient clearance around the tool body and holder.
| Condition | Selection Direction |
|---|---|
| A standard tool reaches the feature without interference | Standard reach may be sufficient |
| The cutting area lies deeper than standard access allows | Consider long reach or long neck |
| Walls or shoulders interfere with the larger tool body | Check neck diameter and neck clearance |
| The required feature is curved or 3D | Select ball nose geometry separately from reach |
| The cavity requires a flat bottom and straight walls | Select square geometry separately from reach |
| The cavity requires a radiused internal corner | Select corner radius geometry separately from reach |
The important point is that reach and end geometry solve different problems.
Do not choose the longest available cutter first and then decide what geometry it should have. Em vez de:
Confirm the finished feature → determine the required access → check clearance → choose the appropriate tool configuration.
Common Mistakes When Choosing an End Mill for a Deep Cavity
Choosing the longest tool by default
More reach is not automatically better. Unnecessary overhang can increase sensitivity to deflection and chatter. Use enough reach to access the feature without adding length the application does not need.
Treating flute length and required reach as the same dimension
The cutting-edge length and the distance required to access the feature are different selection considerations. A deep cavity does not necessarily require the entire extended section to be cutting edge.
Checking cavity depth but ignoring clearance
A cutter can have sufficient reach and still interfere with surrounding walls, ombros, the tool body or holder. Clearance should be checked along the full access path.
Selecting reach before confirming the end geometry
A long-reach structure cannot correct the wrong cutting-end geometry. First confirm whether the finished feature needs square, ball nose or corner radius geometry.
Deep Cavity Milling Tool Selection Checklist
Before selecting an end mill for deep cavity milling, confirm the following:
- What finished geometry does the cavity require?
- What cutter diameter fits the accessible feature?
- What is the smallest specified internal feature or radius that affects tool access?
- How much actual reach is required to reach the machining area?
- How much cutting-edge length is actually required?
- Is there enough neck clearance around cavity walls or shoulders?
- Can the larger tool body, shank and holder follow the required approach and cutting path without interference?
- Can a standard-reach tool already provide the required access?
When a Custom End Mill May Be Needed
A standard end mill may not match every deep cavity.
Custom review may be useful when the required combination of cutting diameter, effective reach, neck clearance and cutting-end geometry does not match an available standard tool.
Por exemplo, a drawing may require a specific cutting diameter together with an extended reach, a particular neck diameter or a defined corner radius.
Nestes casos, send a drawing or sketch showing the relevant dimensions for review.
Tamanhos e configurações personalizados estão sujeitos a revisão de desenho e viabilidade de fabricação.
Perguntas frequentes
Do I always need a long reach end mill for deep cavity milling?
Não. If a standard-reach end mill can reach the machining area without interference from the tool body or holder, additional reach may not be necessary. Choose long reach or long neck only when the feature requires extra access or clearance.
What is the difference between flute length and effective length for deep cavity milling?
Comprimento da Flauta, or Length of Cut (LOC), describes the available cutting-edge length. Required reach describes how far the cutting end must access into the feature. In CutterBest long-neck specifications, this access dimension may be listed as Effective Length (L2), while other catalogs may use terms such as reach or length below shank.
Which end mill geometry is best for a deep cavity?
It depends on the finished feature. Use square geometry for flat bottoms and straight walls, ball nose geometry for curved or 3D surfaces, and corner radius geometry when the feature requires a flat-bottom area with a radiused internal corner.
Why does neck clearance matter in deep cavity machining?
The cutting end may reach the required depth while the larger tool body still interferes with surrounding walls or shoulders. Neck clearance helps determine whether the tool can access the machining area without this interference.
Can CutterBest review a custom end mill requirement for a deep cavity?
Sim. Send a drawing or sketch showing the required feature and tool dimensions. We can review the requested configuration before quotation.
Tamanhos e configurações personalizados estão sujeitos a revisão de desenho e viabilidade de fabricação.
Need an End Mill for Deep Cavity Milling?
If a standard tool does not match the required reach, neck clearance or finished feature geometry, send your drawing or machining requirements for review.
E-mail: sales@cutterbest.com