 Precision Milling Cutters,Cutting Tools for CNC Machining Every Material

When comparing a ball end mill vs flat end mill, start with the part feature rather than the tool price or coating. Choose a flat end mill when the drawing requires a flat bottom, slot, step, straight wall, or square shoulder. Choose a ball nose end mill when the surface is curved, blended, or three-dimensional.
If both feature types are present, use the flat end mill for stock removal and planar features. Then use the ball nose tool for curved-surface finishing. Tool price, coating, and flute count should be considered only after the cutting-end geometry has been selected.
For available standard sizes and custom dimensions, see our ball nose end mills.
You can also review our flat end mills for slots, pockets, shoulders, and other flat-bottom features.
Quick Comparison: Ball End Mill vs Flat End Mill
| Decision Point | Ball Nose End Mill | Flat End Mill |
|---|---|---|
| Cutting End | Fully rounded or hemispherical | Flat with defined outer corners |
| Choose It For | Curved, blended, and 3D surfaces | Flat-bottom and prismatic features |
| Typical Work | Contouring, mold finishing, semi-finishing | Roughing, slotting, pocketing, shoulder milling |
| Surface Result | More continuous on changing curves | Level on planar bottoms and faces |
| Internal Transition | Leaves a radius | Creates a sharp or near-square transition |
| Main Limitation | Inefficient on broad flat bottoms | May leave steps on complex curved surfaces |
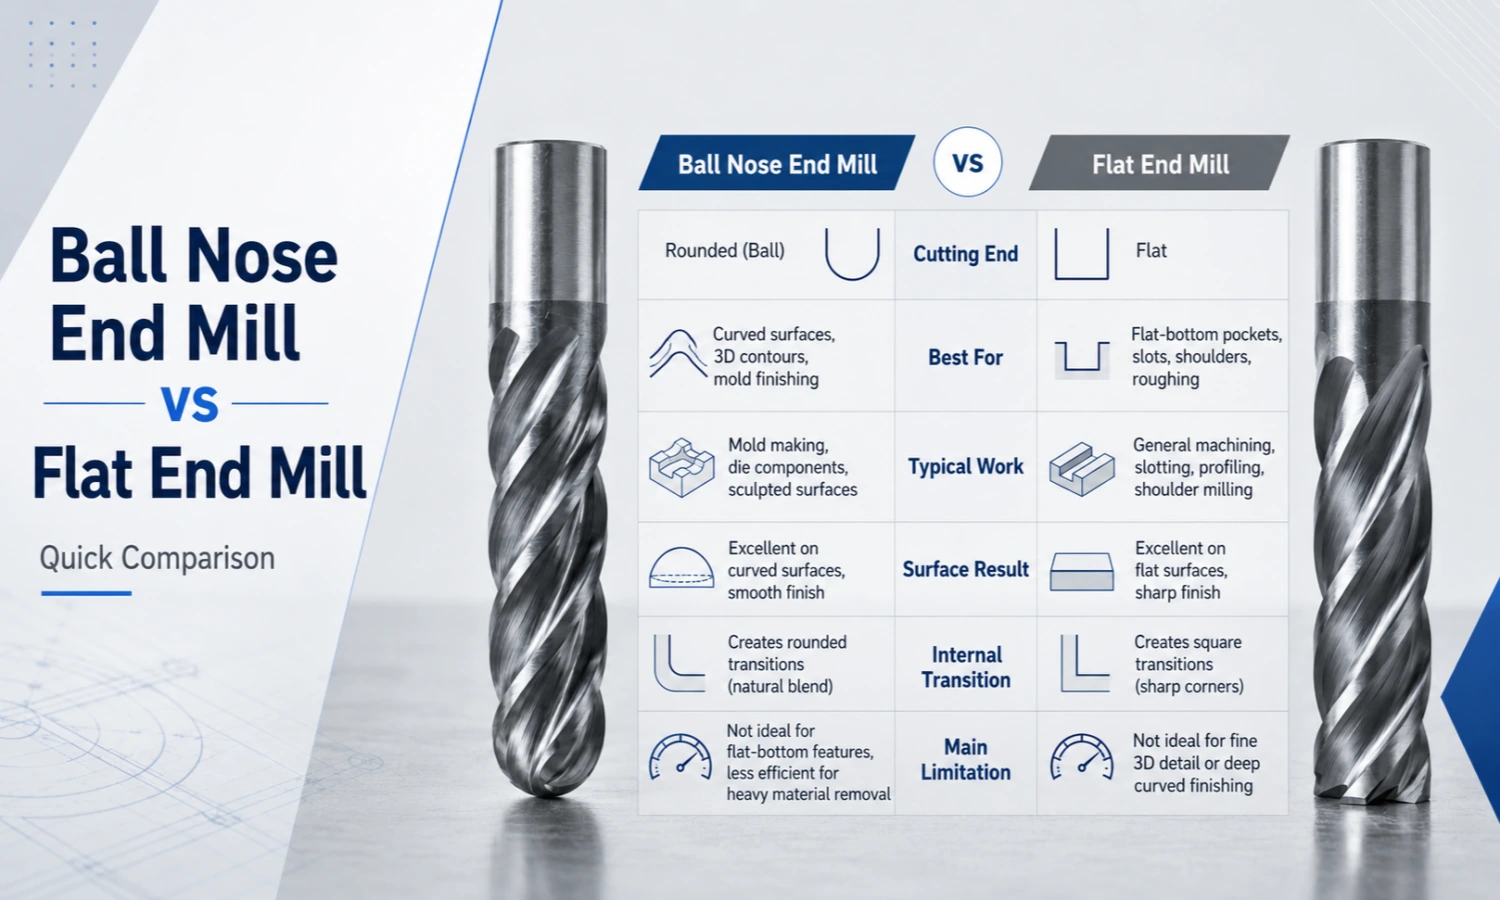
Read the table in this order: part geometry first, machining stage second, and required surface third. Material, machine stability, tool reach, flute count, and coating are secondary checks.
What Is the Geometric Difference?
The main difference between a ball end mill vs flat end mill is not simply that one is round and the other is flat. Their cutting-end geometries create different contact conditions, which affect toolpath efficiency, surface finish, internal corners, and material removal.
Ball Nose End Mill Geometry
A ball nose end mill has a fully rounded cutting end. For a standard full-ball design, the nose radius is normally half of the cutting diameter. For example, a 6 mm full ball nose commonly has an R3 profile.
However, this relationship should not be applied to every radius cutter. Bull nose end mills and form tools use different cutting geometries.
The rounded cutting edge contacts only part of the workpiece at any moment. As the tool follows a slope or freeform surface, the contact point moves gradually around the ball.
Therefore, the cutter can follow continuously changing surface angles without the abrupt contact changes that often occur with a flat cutting end. This is why ball nose tools are commonly selected for curved surfaces, blended profiles, mold cavities, and 3D contours.
Flat End Mill Geometry
A flat end mill has a level cutting end and defined outer corners. The term square end mill is also widely used for this general cutting-end profile.
Because the end face can cut across a planar area, the tool can form flat bottoms, straight walls, steps, and square shoulders efficiently. In addition, the flat geometry creates a clearer transition between the bottom of a feature and its side wall.
The outer corner carries more cutting stress than a fully rounded tip. Therefore, some flat end mills use a small edge preparation to improve corner strength. Even so, the tool remains a flat end mill rather than a bull nose cutter.
How Geometry Changes the Machining Result
Cutting geometry determines how the tool contacts the workpiece. That contact then affects scallop formation, staircase marks, toolpath spacing, material removal, and final surface quality.
Curved-Surface Contact, Step-Over, and Scallops
A ball nose end mill suits continuously changing surfaces because its rounded edge can maintain contact as the surface angle changes.
However, a ball nose tool does not automatically produce a perfect finish. Adjacent tool passes leave a small cusp between them. This residual material is commonly described as a scallop.
Step-over is one of the main factors controlling the scallop height. A smaller step-over places adjacent passes closer together. As a result, the scallop becomes smaller and the surface usually becomes smoother.
However, a smaller step-over also increases:
- The number of tool passes
- CNC cycle time
- Tool travel distance
- Machine operating time
Therefore, the step-over should match the actual surface requirement. Using an extremely small step-over may improve the finish, but it may not be economical when the part will receive additional polishing.
The final surface is also affected by:
- Ball radius
- Tool runout
- Feed rate
- Spindle speed
- Tool overhang
- Machine rigidity
- Toolpath direction
- Workpiece material
Flat-Bottom Contact and Square Shoulders
On a flat or prismatic feature, a flat end mill engages the bottom more directly. Therefore, a level pocket floor or slot bottom can usually be produced with fewer passes.
The defined outer corner also creates a clearer wall-to-bottom transition. This makes a flat end mill suitable for:
- Flat-bottom pockets
- Slots
- Steps
- Straight walls
- Square shoulders
- Planar surfaces
On a curved surface, however, the flat cutting end approximates the shape through separate tool positions. If the step-over is too large, the toolpath may leave staircase marks.
A smaller step-over can reduce these marks. However, the process becomes slower and may still require additional polishing or a ball nose finishing operation.
Material Removal and Machining Efficiency
For slots, pockets, steps, and broad planar areas, a flat end mill normally removes material more efficiently.
More of its cutting end can engage the bottom of a flat feature. Consequently, it can remove stock while also establishing the required flat surface.
By comparison, a ball nose end mill has a very low effective cutting speed near the center of its tip. When the center of the ball contacts a flat surface, it does not remove material as efficiently as the outer cutting area.
Therefore, using a ball nose tool for heavy cutting across a broad flat bottom may create:
- Longer cycle times
- Lower stock-removal efficiency
- Additional heat near the tool center
- More tool passes
- Residual scallops
The opposite applies to complex 3D geometry. On a changing curved surface, the ball nose profile can maintain more consistent contact. Meanwhile, a flat cutter may require much smaller steps and additional finishing passes.
When to Choose a Ball Nose End Mill
Choose a ball nose end mill when the surface changes continuously and a rounded cutter can follow the geometry without abrupt engagement changes.
Typical applications include two main groups:
Complex 3D and Freeform Surfaces
A ball nose cutter is suitable for:
- 3D contours
- Sculpted surfaces
- Freeform profiles
- Curved walls
- Blended radii
- Continuously changing surface angles
Its rounded cutting end follows these features more naturally than a flat end mill. As a result, it can reduce staircase marks and create a more continuous finish.
Mold Cavities and Curved Transitions
Mold and die components often contain:
- Deep cavities
- Curved cavity walls
- Radiused transitions
- Blended surfaces
- Complex internal contours
A flat end mill may remove most of the stock, but it cannot finish every curved transition efficiently. Therefore, a ball nose tool is commonly used for semi-finishing and final finishing.
Ball nose tools are not normally the first choice for heavy roughing on broad flat areas. Their main advantage appears when surface continuity and curved geometry matter more than maximum stock-removal rate.
More application examples are explained in what is a ball nose end mill used for.
When to Choose a Flat End Mill
Choose a flat end mill when the drawing requires a flat bottom, straight wall, slot, step, or square shoulder.
Flat-Bottom Features and Straight Walls
A flat end mill can form the base and side wall of a feature more directly. Therefore, it is commonly selected for:
- Open and closed slots
- Flat-bottom pockets
- Steps
- Straight side walls
- Square shoulders
- Planar recesses
The flat cutting geometry also helps maintain a clear transition between the bottom and wall.
Roughing and Stock Removal
A flat end mill is often the practical first tool for roughing flat or prismatic parts.
During roughing, the main goal is usually to remove stock efficiently while establishing the main feature shape. The final curved-surface finish is not yet the priority.
A flat cutter can:
- Open pockets
- Machine slots
- Remove material from broad planar areas
- Establish straight walls
- Prepare the part for a later ball nose operation
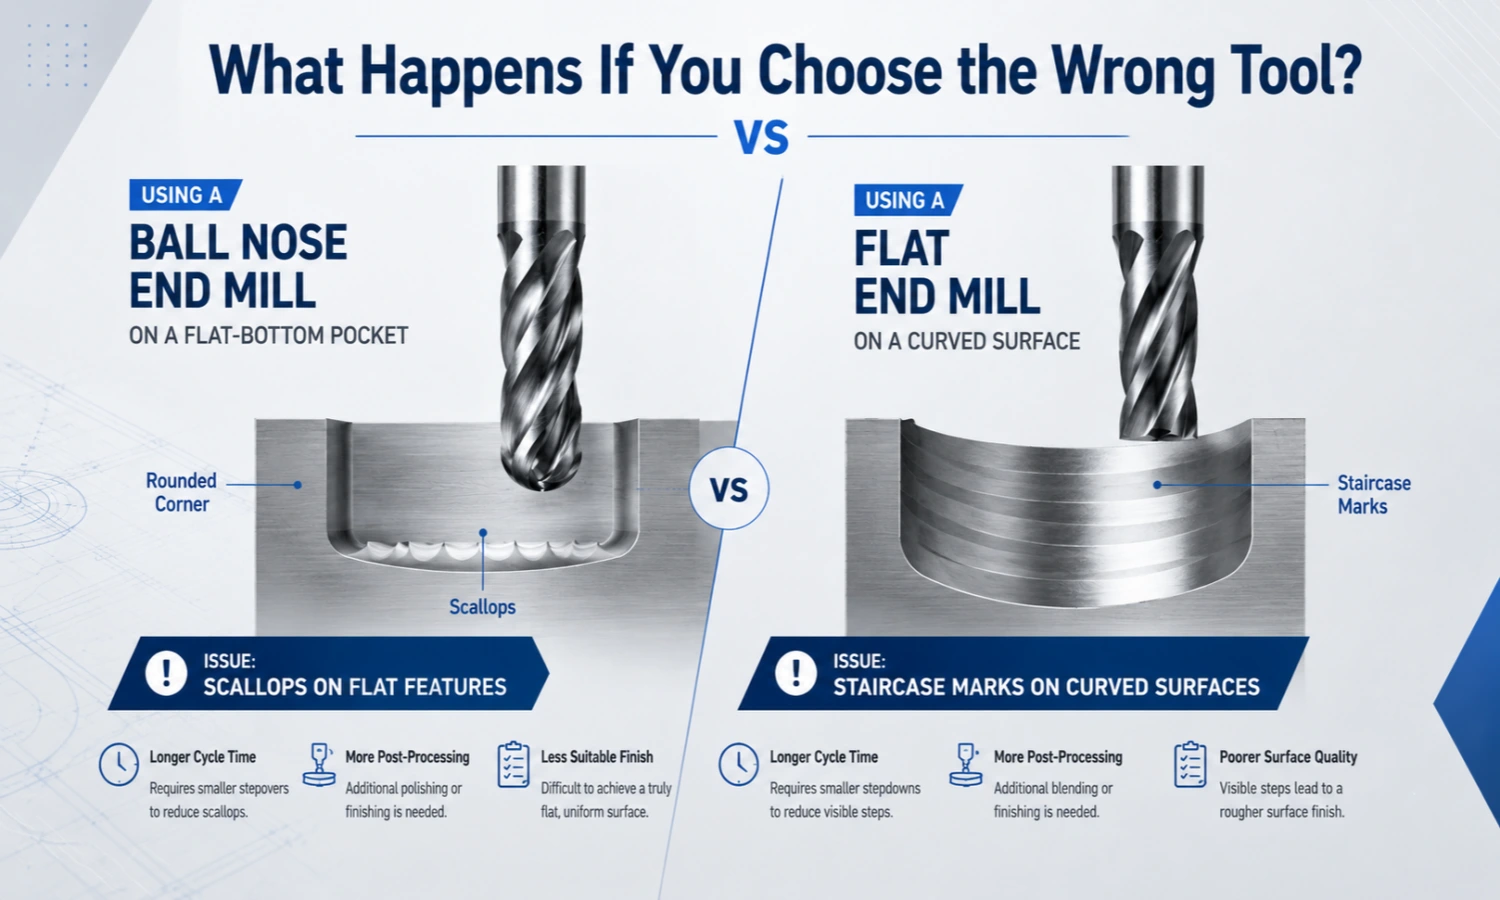
What Happens If You Choose the Wrong Tool?
Choosing the wrong cutting-end geometry can increase cycle time, leave unwanted tool marks, create extra polishing work, and produce a feature that does not match the drawing.
Using a Ball Nose End Mill on Flat Features
A ball nose cutter can remove material from a flat feature, but its rounded geometry does not form a flat bottom efficiently.
Because contact occurs along the rounded edge, the tool often needs more passes. If the step-over is too large, residual ridges or scallops remain between adjacent toolpaths.
The practical consequences may include:
- A longer CNC cycle
- Additional tool passes
- Extra polishing or rework
- An unwanted radius at the wall-to-bottom transition
- A pocket floor that does not meet the drawing
- Inefficient cutting near the center of the tool
In addition, using the center of the ball for heavy flat cutting may generate heat without providing efficient material removal.
Using a Flat End Mill on Curved Surfaces
A flat end mill can follow a 3D CNC program. However, its flat face contacts a curved surface differently at each tool position.
As a result, the toolpath may produce staircase marks. These marks occur because the flat cutting end approximates the curve through a series of small planar positions rather than following it with a rounded profile.
Reducing the step-over can make the steps smaller. However, this approach also adds:
- More tool passes
- Longer machining time
- Increased tool travel
- Additional programming demands
- Possible polishing after machining
In demanding mold work, a separate ball nose finishing operation is usually more efficient than forcing a flat end mill to produce the final curved finish.
Can Ball Nose and Flat End Mills Be Used Together?
Yes. In many CNC processes, using both cutters is more efficient than forcing one tool to complete every feature.
The flat end mill is selected where stock-removal efficiency and planar accuracy matter. The ball nose end mill is then selected where curved-surface continuity and finishing quality matter.
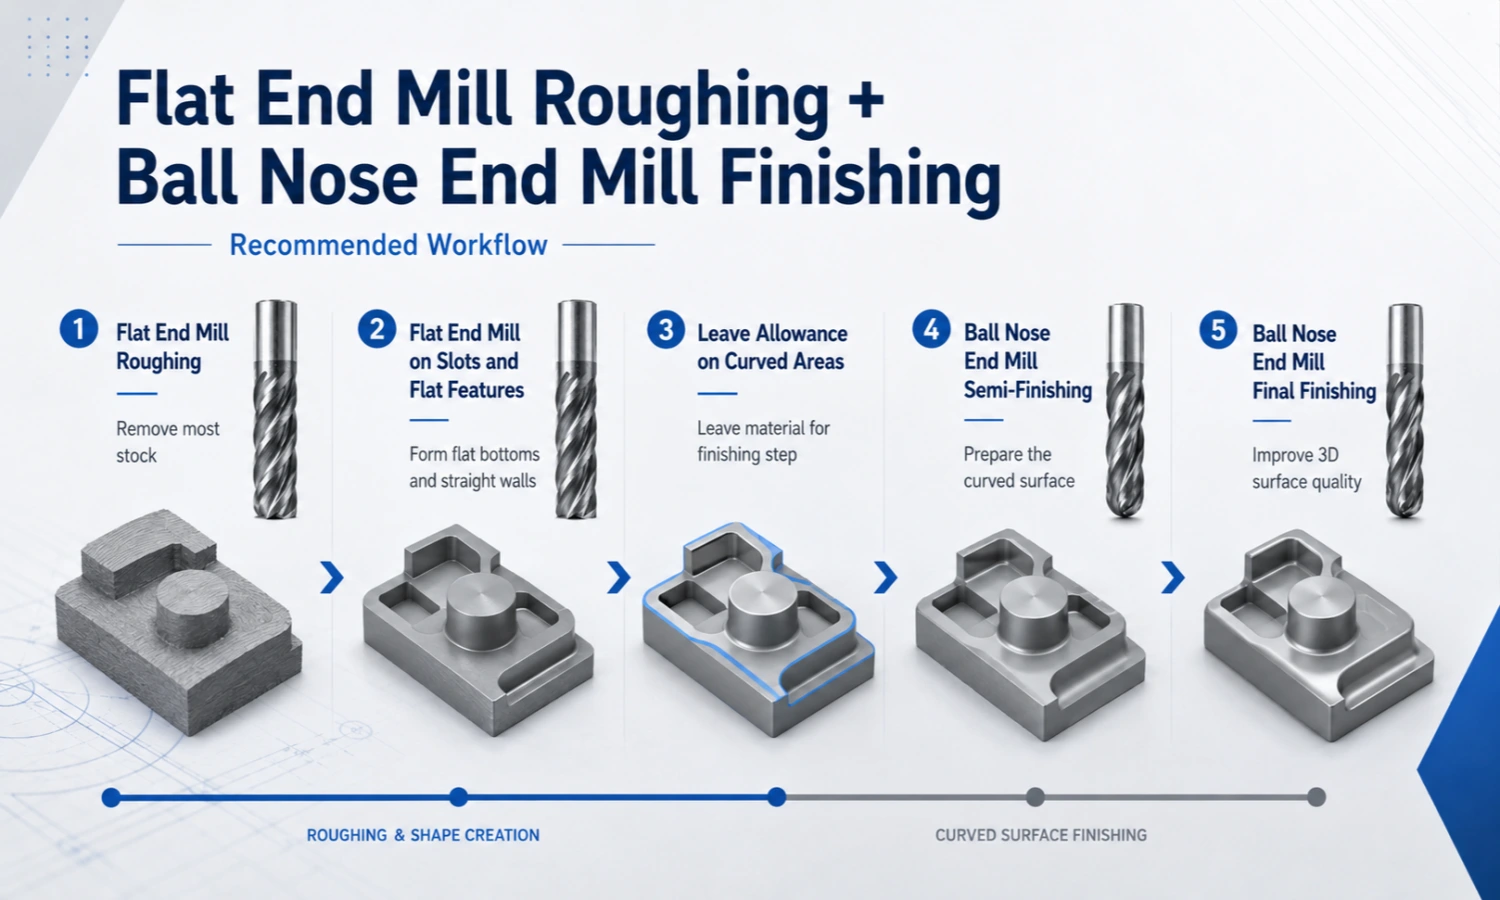
A Practical Roughing and Finishing Workflow
- Use a flat end mill to remove most of the stock and open pockets or slots.
- Finish flat bottoms, straight walls, steps, and square shoulders with the flat cutter.
- Leave a controlled machining allowance on curved and blended areas.
- Use a ball nose end mill for semi-finishing to create a consistent surface.
- Apply the final ball nose toolpath with a step-over that matches the required finish.
This division of work is based on geometry rather than habit.
The flat tool handles operations where efficient stock removal and flat feature accuracy are required. The ball nose tool then handles surfaces where changing angles and finish continuity are more important.
| Machining Stage | Recommended Tool | Main Purpose |
|---|---|---|
| Initial Roughing | Flat End Mill | Remove stock efficiently |
| Slot and Pocket Machining | Flat End Mill | Form flat bottoms and straight walls |
| Curved Semi-Finishing | Ball Nose End Mill | Prepare complex surfaces for the final pass |
| Final Curved Finishing | Ball Nose End Mill | Improve 3D and freeform surface quality |
| Final Flat-Surface Finishing | Flat End Mill | Maintain a planar bottom or face |
How to Choose: A Practical Decision Process
The ball end mill vs flat end mill decision becomes easier when you follow this order:
- If the feature needs a flat bottom, slot, step, straight wall, or square shoulder, start with a flat end mill.
- If the feature is a 3D contour, curved wall, mold cavity, or freeform surface, start with a ball nose end mill.
- If the part contains both flat and curved features, use a flat end mill for stock removal and planar machining. Then use a ball nose end mill for curved finishing.
After choosing the cutting-end geometry, confirm the machining stage, surface requirement, material, tool reach, machine rigidity, flute count, and coating.
| Workpiece Feature or Operation | Recommended Starting Tool | Selection Logic |
|---|---|---|
| Flat-bottom pocket or slot | Flat End Mill | Produces a level bottom efficiently |
| Straight wall or square shoulder | Flat End Mill | Creates a clear wall-to-bottom transition |
| Broad planar roughing | Flat End Mill | Removes stock efficiently on flat geometry |
| 3D contour or freeform surface | Ball Nose End Mill | Maintains smoother contact as the angle changes |
| Mold cavity finishing | Ball Nose End Mill | Follows radii, blends, and curved cavity surfaces |
| Flat roughing plus curved finishing | Use Both | Flat removes stock; ball nose finishes the curves |
Secondary conditions can refine the selection.
For example, a long cutter or excessive tool overhang reduces rigidity. In addition, an unsuitable flute count or coating may limit chip evacuation and tool life.
However, these factors do not replace the first decision about cutting-end geometry.
For a detailed review of radius, diameter, reach, flute count, coating, and material, see how to choose a ball nose end mill.
Common Mistakes to Avoid
Choosing by Diameter Instead of Feature Geometry
Two cutters with the same diameter can produce very different results.
A flat end mill and a ball nose end mill may share the same nominal diameter, but their cutting behavior, contact area, internal corner shape, and surface result are different.
Therefore, match the cutting-end geometry to the feature before finalizing the diameter, flute count, or coating.
Ignoring Step-Over and Toolpath
The correct cutter can still produce a poor finish when the toolpath is unsuitable.
A large step-over may leave visible scallops with a ball nose tool. Likewise, a flat cutter may leave pronounced staircase marks on a curve.
Therefore, tool geometry and CNC programming must be considered together.
Using Excessive Tool Overhang
A long unsupported tool is more likely to vibrate or deflect.
This may cause:
- Dimensional variation
- Unstable cutting contact
- Visible tool marks
- Poor surface quality
- Reduced tool life
Use the shortest practical cutter and tool overhang that can reach the feature.
Finally, do not judge the choice only by the tool purchase price. A cutter that increases cycle time, polishing, rework, or scrap may create a higher total machining cost.
Ball End Mill vs Flat End Mill FAQ
Can a ball end mill make a flat-bottom pocket?
A ball nose cutter can remove material from the pocket, but it does not naturally form a complete flat bottom or sharp bottom corner. A flat end mill is normally the more efficient and accurate choice for this feature.
Can a flat end mill machine 3D surfaces?
Yes, a flat end mill can follow a 3D toolpath. However, the flat cutting end may leave staircase marks unless a very small step-over is used. For final curved-surface finishing, a ball nose cutter is usually more practical.
Which cutter is better for roughing?
A flat end mill is generally preferred for roughing flat, slotted, pocketed, or prismatic features because it can remove stock efficiently while forming planar surfaces.
However, cutter selection still depends on the feature. A ball nose tool may be used for semi-roughing or semi-finishing inside complex curved cavities where a flat end cannot follow the geometry effectively.
How does step-over affect a ball nose finish?
Step-over controls the distance between adjacent tool passes.
A smaller step-over reduces the scallop left between the passes and normally improves the surface finish. However, it also increases toolpath length and CNC cycle time.
Therefore, the step-over should be selected according to the required surface quality, ball radius, workpiece geometry, and available machining time.
Can both cutters be used in the same CNC program?
Yes. A common CNC program uses a flat end mill to remove stock and establish slots, pockets, flat bottoms, and straight walls.
It then switches to a ball nose end mill for semi-finishing and final finishing of curved regions. This approach improves stock-removal efficiency without sacrificing the final surface quality.
Send Your End Mill Requirement
Choose a flat end mill for flat-bottom and straight-sided features, a ball nose end mill for curved and three-dimensional surfaces, or use both tools when the part combines roughing and finishing requirements.
Send us your drawing, workpiece material, hardness, required dimensions, machining features, and quantity. We will review the application and recommend a suitable cutter or combined machining process.
View our ball nose end mills and flat end mills,or email sales@cutterbest.com for a quotation.